Thursday 27 October 2011

The Village Carpenter by Walter Rose -Book Review

This week I stumpled upon a book in my local library. Called "The Village Carpenter" by Walter Rose. It tells the story of the life of, you guessed it a Carpenter growing up in a village in Victorian England. Our hero tells us about his Grandfather and they way he worked with trees to finished items and how the advent of machines changed the way they worked. Remember this is a way of life, a means to make a living, not a weekend pursuit or hobby.
 I've not read through the whole book yet, but I've come accross so many useful and insiteful snippets thus far I felt I had to blog about it instead of tweeting at Christopher Schwarz @RudeMechanicMarc Spagnuolo @WoodWhisperer and the rest of the crew I've been bugging with my tweets. Sorry guys, I just get over excited some times. Below is a little snippet our hero has to say about design.


"No ammount of added ornament or excellence of finish can make a badley designed structure look well. Everyone can remember examples where much skill and labour has been expended on work desigend on wrong lines. The result is always that the eye turns away from it dissatisfied. But good design will give pleasure to the beholder even when the finish is not perfect."

Worth some thought there the next time you work from a rough sketch without paying attention to the design details. I've been guilty of that on more than one occasion, and ended up disappointed with the results.

And next time you think you're too tired to do any more work, thing on this little extract:

"Many of our men walked four to five miles daily to work at distant places. Grandfather frequently retold  his early feats of strengh and endurence, of walking to and from Swanbourne, for instance ( about 17 miles) , where he did a days work of carpentry, carrying his tools each way. He admitted he was tired on his return."

And they carried their tools! Imagine humping a table saw 4 miles or 17! to a job? I think hand tools would be the order of the day, (they had no such thing as electric tools then anyway) and not that many of them.

Here's an extract on how the usable wood in a fallen tree was calculated. I can't quite wrap my head around it, see what you think:

"For the measurement of trees my father always used a string and a slide rule. As the trunks of trees taper lenghtwise, the middle was taken as the average girth round which the string was passed. I have helped him many times, holding the string carefully with my fingers at the place where it terminated the circumference as measured, afterwards doubling it and then redoubling it twice, with the result that the folds held in my hand were each an eighth of the total circumference. Then he would direct me to drop one eighth part- this an allowence for the bark- and double the remaining seven eighths twice. Each fold of the string was now one-fourth part of the seven eighth of the circumference. He would take the lenght of this with his rule. The measurement thus arrived at represented the "girth", or one side of a squared log, supposing the content of the log to have been square instead of round. On that basis he would then ascertain the cubic content of the log by the use of his slide rule"

What now? Can anyone explain this?

 I'm just starting the chapter entitled "Tools" and will update this blog accordingly. Why not drop back in a few days.

Monday 24 October 2011

New to Woodworking? Start here.

The other day I had a revelation. "When starting a new subject you need to start at the beginning." I not sure where I heard or read it, but it made me dig out an old woodworking book I bought from a charity shop, more as a joke than a serious woodworking journal. But as I re-read the book, I realised what little golden nuggets of valuable information were held in these pages.
It is Ladybird's " 'How to do it' Woodwork ". 

It was first printed in 1973 (pre-disco) and although it was written for young children as an introduction to woodworking through it's fifty or so 6"x 4" pages it gives a good basic introduction to woodworking for anyone. As the great Mitch Hedberg once said "Every book is a children's book if a kid can read it." Well with this book the reverse is true, it may be a kids book, but if you are new to woodworking your knowledge is that of a child's so what better place to start.


Let me take you through a few pages and you decide. It won't take long. It's only fifty pages long and twenty five of them are pictures.  

The inside cover has a world map with locations of wood types and species. Page one is a history of wood and it's uses followed by modern uses, how a tree grows, what wood is good for what purpose. Then we get into the different types of lumber cut, Tangential, Quarter Cut and Through and Through. How wood is dried and the inherent defects. The different types of man made boards available.


Then we enter the realms of tools, types and differences. Hand saws, cross cut and rip, how to hold it and how to cut. Marking gauges different types of planes and their anatomy, chisel profiles, sharpening techniques (25/30 degree FYI). Drills, clamps even the correct way to sand it's all there.


The final two pages hold the worm on the hook. They would inspire anyone with a passing interest in wood working to delve deeper. It has a picture of a chair with examples of bridle, cross halving, mortise and tenon joints and finally dove tails and housing joints. 


As you can see from the pictures here in, it's not the best woodworking book ever printed, it won't give you all you need to know, but enough to get you started on the woodworking journey.

Sunday 9 October 2011

Tin Bashing

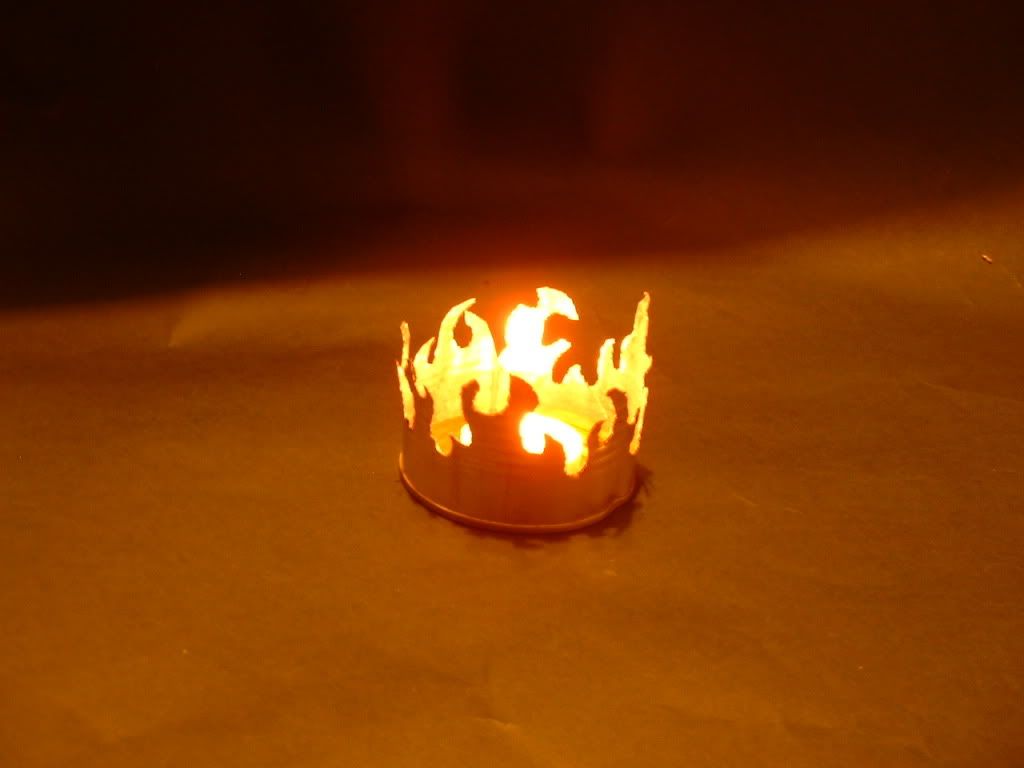
I recently got a book first published in the 1930's called Tin Can projects and Art Metal work. It gave instruction on producing small items for the home made from recycling old food tins. Things like candle holders and titbit dishes. It was written as a way of giving information to a desperate people in a recession and as we are heading in that direction I thought it was relevant to have a go in today's unsure world.
It had a list of methods and techniques and gave me a little burst of inspiration to create. That was one part of the inspiration, the other came from the firebowls of John T. Unger.

So I had my tin can, derived of all traces of cat food, now I needed a design. I've done a little air brush work and can draw a mean cartoon style flame. I wanted a design similar to John's firebird grills but with my own twist. I experimented with a few sketches to get the level of balance and detail right for the size of tin then transferred the design to the tin with a Sharpie. Now I had to cut it out. 
Tin snips proved to be too big and awkward to wield without the danger of loosing a finger and after shedding a little blood for my art I decided to uses another method.
The book talked about using a punch or die to cut holes in the cans, so I took it a step further and decided on using a chisel about 4mm wide. DON'T PANIC! I didn't use a wood chisel, I took a big 6 inch nail and used my trusty hand grinder to fashion a flat cutting edge. This I then used to stamp out the design, following the line of the Sharpie.
But now problem number two made its début. As I struck the cutter with the forced needed to cut the tin, it caved in. I needed some snug support. I took a block of square wood, a foot of a palette, and with a block plane worked it into a cylinder of wood which fitted so air tight I needed to insert a screw to get it out. It took a little time and effort but I now have a former to use again and again.
It proved a very therapeutic exercise following the line and the result was pleasing enough for a first attempt.
In theory I could cut any design, which has opened up a world of possibility, you could do it too, just look out for the sharp edges and don't cut yourself.